

Whether you’ve recently committed to ordering your very first flock or your incubated eggs are nearing their hatch date, preparing your future flock’s temporary home will certainly be the next step on your to-do list. If you are new to backyard chicken keeping, your brooder will serve as a safe space as your flock continues to fully develop before being old enough to transition to their future coop. Fortunately, your brooder can be easily put together by following a few simple steps and safety precautions listed below!
Container:
Brooders can be fashioned out of a number of large containers, some of which you may already have at your disposal. You may also follow our dimensions guides to easily construct a brooder of your own as well! Below are a few ways to repurpose a few items as a brooder for your future flock.
Galvanized or Plastic Stock Tank:
Often found in most local feed stores, galvanized stock tanks may range in a number of sizes. Although often used as a water system for livestock, stock tanks can be a great brooding container for chicks. Tanks are available both in a circular and oval form and can be easily repurposed for years. Additionally, it’s important to note that as your flock grows, you’ll need to create a simple wire covering to prevent your flock from jumping out once older as well as to protect them from any surprise pet visits.
Doggy PlayPen:
Doggy Playpens are a great, inexpensive, and space-saving brooder option for growing chicks. Most playpens come with a detachable top and are easily moveable. We suggest going with a fabric or plastic option as opposed to a metal pen. Before selecting this brooder option for your flock, it is important to note that this brooder choice will not be as strongly structured like that of a stock tank or wooden set-up. If you have a concern with anything that may disturb your brooder set up, we would suggest going with a more stabilized structure.
Plastic Storage Bin:
Plastic storage bins similar to those used to store items are another great alternative! A plastic storgae bin will require a few customized adjustments prior to being used for your chicks. Although this repurposed option works well for chicks, it is important to note that when selecting a plastic storage bin, the bigger the better to accommodate your birds as they age. Additionally, depending on the breed you are brooding, this easy brooder alternative may serve as an excellent option for up to 3 to 4 weeks. For tips on how to repurpose a storage bin as a chick brooder, we recommend visiting the helpful tips shared here.
Repurposed Baby PlayPen:
Have a stored away baby playpen that you’ve been meaning to sell? Before putting it on Facebook Marketplace, consider repurposing it as a chick brooder!
If you’ve recently purchased a Walk-in Model Roost & Root Coop (Loft, Walk-In, Stand-Up), we suggest repurposing your shipping crate and following along on our simple step by step video shared below!
Brooder Dimensions:
Have a few pieces of plywood to repurpose? If you are considering building your very own brooder at home, we suggest building with the following recommendations in mind.
Depth:
Once your flock members reach 3 weeks of age, the possibility of them jumping out of their brooder becomes almost inevitable. To prevent any escapees we suggest building with a depth of over 12 inches.
Size:
Again this all depends on the number of chicks you plan on raising. For beginning flock owners, we always suggest starting off with 4 to 6 chickens. Depending on the season in which you plan to raise your flock, you may need to build a brooder to account for more. In the Spring season, many hatcheries will allow for minimum orders of 3 chicks, however during non-hatch seasons such as Fall & Winter, minimal orders range from 20 to 25 chicks.
Location:
When you’ve chosen your ideal brooder container, it’s time to select the right location for placement. Chicks are easily susceptible to a number of environmental factors and dangers, and as a new flock owner, it’s vital to prepare the safest space for your flock to mature. We highly suggest placing your flock’s brooder in a space that is free from pets, high moisture, and low-temperature drafts.
It is also best to take into consideration the noise surrounding your chicks, although you may want your flock to be near as to supervise their safety at any time, it is best to select a location with the least commotion to allow for your flock members to rest peacefully. As chicks slowly transition out of their fluffy plumage, you may notice a significant amount of light dust, this is in part due to the turnover of feathers and skin cells.
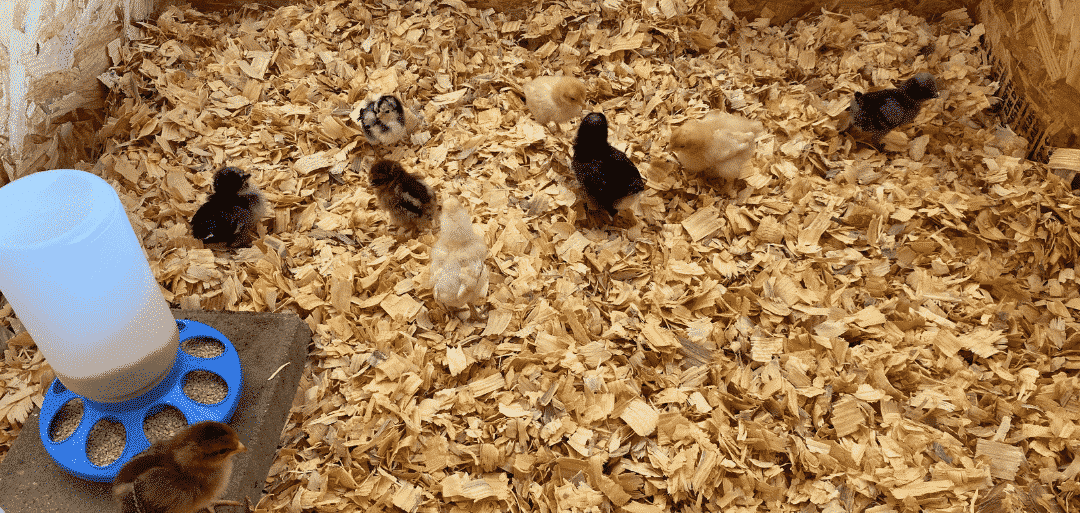
Bedding:
Regardless of the number of baby chicks in your brooder, it’s important to be aware of the consistent cleaning of your chicks brooder that will be required for the next 6 to 8 weeks. To make cleaning up less bothersome, it’s helpful to select the right kind of bedding for your flock. Selecting moisture absorbing and non-slip bedding is ideal for your flock’s health and comfort. It is also important to select bedding that is non-aromatic to prevent any respiratory harm to your chicks.
Untreated Pine-Shavings:
One of the most popular bedding options, untreated pine-shavings serve as great moisture absorbing, inexpensive, non-slip option for brooders. If you plan to use a container with a slippery bottom surface, consider adding a base layer of non-slip material. When using pine shavings, we recommend using a layer of 1 to 2 inches.
Construction Grade Sand:
When chosen correctly, sand can be a great absorbent in your brooder. It is important to ensure that the sand in your brooder is not fine-grade sand, such as that used for children’s sandboxes. Brooder sand should have large grains to create traction and prevent dust accumulation. When used correctly sand will act similarly to that of cat litter, allowing you to sift any waste. For tips on how to implement sand in your brooder, consider the following method visit the following link.
***Health Note: Non-slip bedding becomes vital as to prevent your chicks from getting Spraddle Leg. Spraddle leg is an injury or birth complication that affects the tendons of your young chick’s legs. Although simple to correct, Spraddle Leg will leave a chick unable to walk correctly, resulting in a chick being unable to carry its own weight. It is for this reason that we only recommend shredded newspaper and never full sheets as a bedding option.
Heat:
A heat source for your chicks is one of the most important necessities when it comes to brooder preparation. The right heat source is best chosen with the consideration of your chick’s bedding and brooder container in mind. Two of the most common and recommended heat sources include a heat lamp and a heat plate.
Heat Lamps:
Heat lamps work well with shredded newspaper and untreated pine shavings. For the best cautionary care, it’s best to avoid this heating method when it comes to the use of sand. Lamps should always be securely clamped to a brooder wall or arranged overhead with a secure and adjustable chain. Most brooder specific lamps will have a metal guard around the lightbulb for safety and have a recommended wattage capacity.
To select the correct lightbulb, it’s important to consider the size of your brooder as well as the number of chicks you have. To adjust the heat each week of your heat lamp, simply raise the heat lamp and or switch to a lower wattage bulb. It is best to evaluate the conditions of your chicks heat lamp a few days prior to placing chicks in their brooder to ensure accurate heating. Oftentimes you will be able to immediately note your chick’s comfort by their behavior. If chicks are panting or are very quiet, your heat lamp is drastically too warm. If your chicks are huddled together, then your chicks are cold and you will need to adjust your heat lamp’s height or bulb.
250 Watt Infrared Light Bulb: Recommended for brooders holding over 25 chicks.
125 & 175 Watt Heat Bulb: Recommended for brooders holding 13 or fewer chicks. To ensure that your brooder is acclimated correctly, place a thermometer at the bottom of your brooder. Newly hatched chicks should have a heated space of 95 degrees Fahrenheit for the first week. Temperatures will need to be decreased by 5 degrees as each week passes until your chicks reach their recommended coop age of 6 to 8 weeks. When beginning, we suggest adjusting your heat lamp to 18-20 inches above your brooders bedding.
For reference, make sure to refer to the following temperature recommendations.
Newly hatched – 95 degrees F°
1 to 2 weeks of age – 90 degrees F°
2 to 3 weeks of age – 85 degrees F°
3 to 4 weeks of age – 80 degrees F°
4 to 5 weeks of age – 75 degrees F°
Heat Plate:
Although more costly than heat lamps, heat plates can be a much safer and well worth investment. Heat plates are suitable for every bedding choice and brooder container option and can be easily adjusted. Heat plates will often come in various sizes and will have adjustable heights to accommodate your chicks as they age. A good rule of thumb to ensure that temperatures are accurate is to once again observe your flock’s behavior. Chicks should be able to easily enter underneath the heat plate to lay. If chicks are standing and chirping often, your heat plate needs to be adjusted lower. If your chicks cannot enter underneath or refuse to remain under their heat plate, a height adjustment will be needed.
Cleaning:
Cleaning your chick’s brooder will depend on the bedding you select and the amount of waste and odor. Maintenance may be minimal in the beginning, but may increase to a daily regimen as your flock grows older. Once your flock grows old enough for their coops, frequent cleaning will become a thing of the past.
Feed:
When it comes to your flock member’s nutrition, it is important to start your chicks with a Starter crumble feed. Starter feeds provide a high content level of protein that will aid in your chick’s growth by including a number of minerals and nutrients needed to develop their immune system. Starter feed may come as a medicated or unmedicated option. Medicated feeds are chosen as supplemental and optional protection for chicks as a means of preventing any chicken specific illnesses. Oftentimes unmedicated feed will be fine, especially if your chicks are raised from your very own flock members.
Waterer Container:
Chick waterers can come in two popular options: a waterer nipple and a poultry jar with a screw-on poultry waterer dish. These two waterer options are quite inexpensive and can easily be put together and maintained over time. Poultry nipples are common in large hatcheries and are helpful when transitioning your flock to a larger poultry nipple watering system. Poultry nipples can also become a cleaner and space-saving alternative compared to the commonly seen red dish poultry jar. To ensure that your chicks do not scratch bedding and waste in their poultry jars, we suggest slightly elevating your chick’s waterers either by using a thin cement block or a block of wood.
Feeder Container:
Most feed containers for chicks will either be available in a circular or long rectangular form. All chick feeders are made with small openings for chicks to peer inside and eat without dispersing feed everywhere. Include links to both options.
We hope you find this article helpful as you begin or continue your backyard farming journey! If you ever have questions regarding anything mentioned in this blog post, reach out to us at 877-741-2667 or email us at support@roostandroot.com. We’re real people and always happy to help!